


In Windows 7, you can share files on home network easily using Home Group but creating an FTP server gives you many benefits. The FTP can also be accessed by other Operating Systems in the network, You can also configure it to be accessed from anywhere through internet. In this short tutorial, I will guide you to make an FTP Server on Windows 7 for LAN.
If your IIS is already installed then start from step 4.
Step 1
Open control panel and then click on Programs.
Step 2
In Programs, click on Turn Windows features on or off.
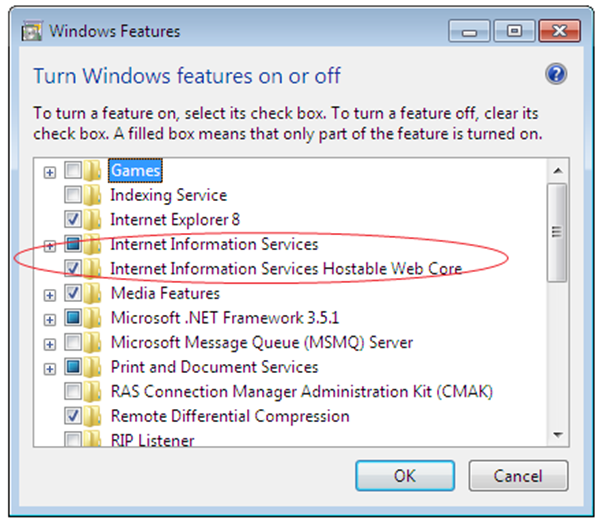
Step 3
After clicking Turn Windows features on or off you will see a new window. Find Internet information Services and mark check on it and then click OK button.
Use the FTP Site Wizard to Create an FTP Site With Anonymous Authentication
In this section you, create a new FTP site that can be opened for Read-only access by anonymous users. To do so, use the following steps:
- Go to IIS 7 Manager. In the Connections pane, click the Sites node in the tree.
- Right-click the Sites node in the tree and click Add FTP Site, or click Add FTP Site in theActions pane.
When the Add FTP Site wizard appears:
- Enter "My New FTP Site" in the FTP site name box, then navigate to the "%SystemDrive%\inetpub\ftproot" folder that you created in the Prerequisites section. Note: If you choose to type in the path to your content folder, you can use environment variables in your paths.
- Click Next.
- Choose an IP address for your FTP site from the IP Address drop-down, or choose to accept the default selection of "All Unassigned." Because you will be accessing this FTP site remotely, you want to make sure that you do not restrict access to the local server and enter the local loopback IP address for your computer by typing "127.0.0.1" in the IP Address box.
- You would normally enter the TCP/IP port for the FTP site in the Port box. For this walk-through, you will choose to accept the default port of 21.
- For this walkthrough, you do not use a host name, so make sure that the Virtual Hostbox is blank.
- Make sure that the Certificates drop-down is set to "Not Selected" and that the Allow SSL option is selected.
- Click Next.
- Select Anonymous for the Authentication settings.
- For the Authorization settings, choose "Anonymous users" from the Allow access todrop-down. Select Read for the Permissions option.
- Click Finish.
Click finish and you are done. You can now access this local FTP server from any other node of your local network. In my case the URL for the FTP is ftp://127.0.0.1


